A Midsummer's Bikepacking Trip

I recently went on a 3-day solo bike packing trip and wants to share what I did to help prepare for your next bike packing adventure. Read below to find out how I got my new Kona Honzo ready, what equipment and food I packed, and how i packed it and carried it.
It was a trip I thought about doing for 2 years and finally decided to do this summer. Just to get away from everything for a few nights. I left from our house in Ottawa, biked to Lac Phillippe in Gatineau Park, Quebec via Chelsea, and spent a second night camping at Lac Taylor before returning home.
It really isn’t as hardcore, scary or intimidating as you think it is! The full story of my adventure will be posted on the Kona Cog Blog soon. You can read more about my trip and check out the other great stories too.

Want to know more about our adventure-girl ? Check out these links:
https://www.konaworld.com/team_Sandra_Beaubien.cfm
https://spark.adobe.com/page/N2peSfkq9VxtK/
Bike Preparation
There are a few simple and relatively inexpensive things you can do to help get your bike ready to make the bikepacking experience as enjoyable as possible.
Front Chanring
If you plan on long days in the saddle or expect a lot of hills, your gearing needs to be easy to help manage the extra load and weight on your bike. This means adding some easier gearing. The easiest and cheapest way to do this is change your front chainring to a SMALLER one. Front chainrings are measured by the number of teeth they have. My Kona Honzo CR, came with a 1x11 drivetrain with a 32 tooth front ring (32t). I got Full Cycle to install a 30 tooth front ring (30t) for me to make it easier to pedal in the easiest gear and this made a HUGE difference! I could keep a faster cadence for the entire first day, which meant my legs did not burn out as quickly, and when the hills were steep I could keep pedalling so I didn't have to walk anything. The extra weight on the bike is really felt on the climbs and at the end of the day!

Frame Tape
With some rain in the forecast on my trip, and having learned from previous trips, bike packing bags, especially the frame bag, can get grit and gravel under the velcro straps and this can leave a lot of scratches on your bike. Since this was my Honzo’s first bike packing adventure, I took the time and put clear helicopter tape under the velcro straps. It took me a good hour (realistically, maybe 2 hours) but my frame is still in mint condition.

Packing Tips
This by no means is an expert list of what to bring on a 3-day solo trip, think about it as “this is what Sandra took and survived”.
Food
Bring extra food. You will eat it all. The calorie consumption while bike packing is huge. I have no scientific evidence, but I can guarantee after day 1 you will be hungry almost all the time. I chose to bring dehydrated meals to save weight since I was on my own. I did learn that 2-year-old dehydrated food does not taste very good. It tasted great 2 years ago, but it certainly has a shelf life. But I was hungry enough to eat it. An old backpacking habit I have is to plan on eating something hot and salty when you get into camp. For me, this is a package of Mr. Noodles. Not a solid nutritional meal, but it is a quick and easy snack to get some instant calories, warm liquid and salt into your system.

Clothing
It is really easy to overpack clothes on a bikepacking trip. Accept the fact that 3 hours into day 1 your riding gear will be stinky, but it won’t really get any stinkier, so you might as well wear the same shirt, outer shorts, and socks 3 days in a row. I brought 2 bike short liners, which worked well, and one base layer to wear in case it was cold riding. I made sure to have dry clothes including quick dry pants, a sweater, base layer, and warm socks to wear at camp and to bed. I brought 2 sports bras, one to ride in and one clean one to wear at camp. I brought underwear, but I can never seem to find it when I am changing at camp anyway, so I will re-think that for next time. 😊

Little things
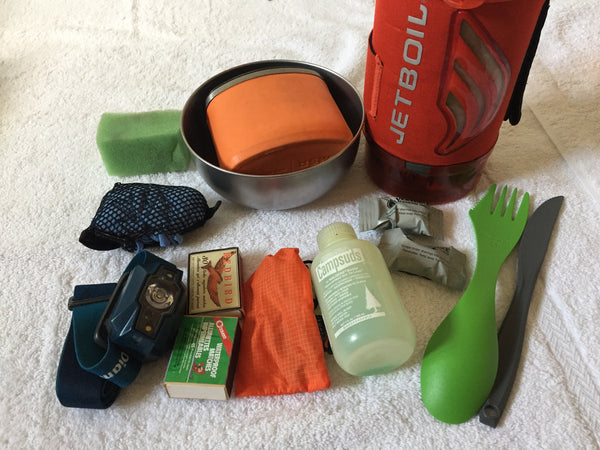
Be very careful of all the cute little things you can buy and bring with you on a trip, those clever little things you think you can’t live without for 3 days. These little things can quickly add pounds of weight and take up a lot of limited bag volume and you most likely won’t use them. Below is a picture of my “little things”, all of which are functional items primarily for warmth and comfort based on past trips, and not just because they are “cute”. Save your toothpaste samples from your dentist because they are perfect for trips like this.

Bike tools
I brought the minimum amount of tool that I felt I could get away with. When I was packing the night before I felt like I should have more, but I brought what I knew how to use and I figured I could have been rescued by Mike if needed. But you will need at least one inner tube, tire lever, a pump, a multitool, and I brought a lock, just to be safe.

Cooking supplies
Keep it simple when bikepacking. You don’t need any cute little cooking utensils or espresso machines. They add up to a lot of weight and space very quickly. I know I need tea and warm food at least once a day, so bikepacking without a stove is not an option for me. My cup nests in my bowl, and all my little things fit inside my cup. The Jetboil stove we use is perfect for boiling water for tea and re-hydrating food. One spork is usually what I carry. And a small knife. I always bring matches and fire starter as a back up.

Toiletries
Minimal supplies is best. It is easy to overpack these items. but you need some essentials. I bring a variety of painkillers and antihistamines in one bottle. Other than my glasses, contacts and small mirror to put my contacts in, you just need things to brush your teeth and wash your hands. The pocket soap is great for this. Kleenex and TP are, well, essential. Don't expect any campsite to have Charmin in the outhouse.

Miscellaneous
A thin rain jacket for summer bike packing is awesome and essential. Small, lightweight but important to stay dry if you get stuck out in a thunderstorm, and it adds a lot of warmth in the wind or in the evening. I like sandals at camp so I don’t have to hang out in my stinky bike shoes after a day of riding, and a book is a must for me. I bring a USB charging battery pack that allows for 5 charges of my phone since it is my essential tool for navigation and emergencies. I brought a real camera to save the battery life of my phone and had a first aid kit. (not shown in the picture) Those long rubber NiteEyez twist ties are for emergencies, in case something breaks on one of my bags and I need to strap things back together. Also not pictured is a spare dry bag which is really important to keep things dry when the weather turns against you.

Sleeping Gear
This is by far the heaviest and bulkiest of everything I bring. I use a hammock, with special straps, and a specific hammock tarp for sleeping. I used an under quilt that goes under the hammock for the first time this trip, but I think I prefer sleeping on a Thermarest under me in my hammock. My sleeping bag is a lighter 5-degree summer weight bag and borderline warm enough, but I ALWAYS pack a down jacket that I can use when sleeping or as needed on the trip. I also bring a beanie to sleep in. I always keep my head warm when sleeping outside. 😊

Packing
I always think everything won’t fit in my bikepacking bags but it always does. I often have to change where I put things in each bag but eventually, I get everything where I want it. I have a designated packing room, and Mike took a picture of my as I was jamming things into a dry bag, but like magic it all fit on my bike!

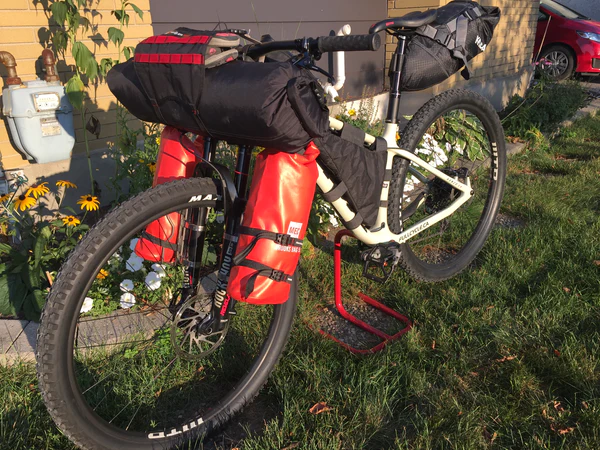
And here is what Honzo looked like all packed up and ready to go!

As I said, this is what worked for me on a solo trip. I know more serious bike packers take less stuff than me, and others might take more stuff, but this is what kept me going for my 3 day trip to Gatineau Park and back.
I hope this gives you some ideas about doing your own trips and how to start organizing gear and food.
The full story of my adventure will be posted on the Kona Cog Blog soon.
Have fun out there !
 Sandra Beaubien